Standard Operating Procedure for Safely Replacing Wear-Resistant Roll Shells
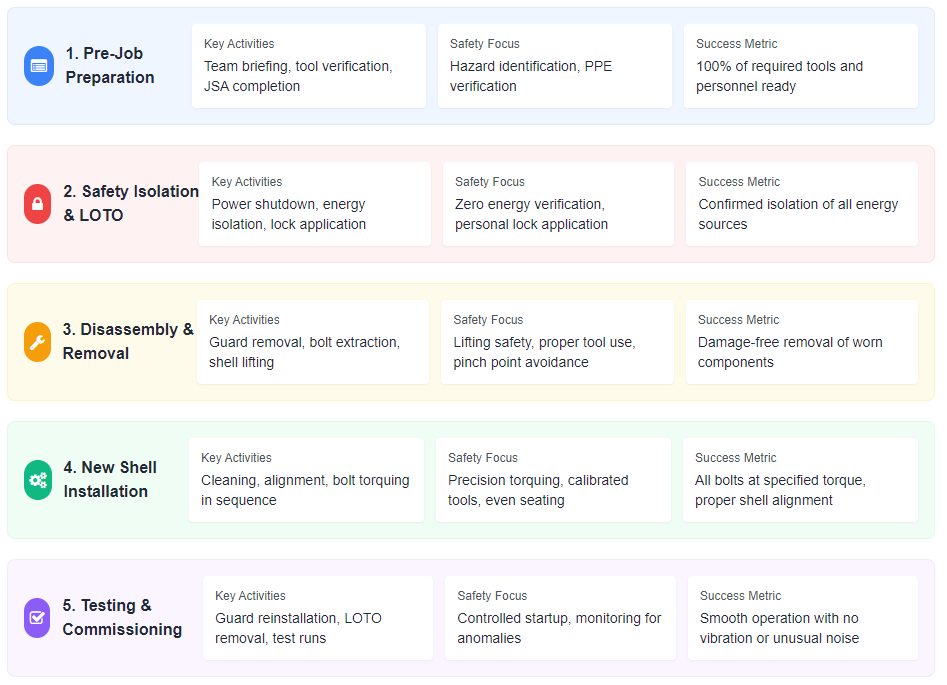
Replacing the wear-resistant shells on a roll crusher is a high-risk planned maintenance activity that demands strict adherence to safety protocols. An improperly executed replacement can lead to equipment damage, extended downtime, and severe personal injury. This Standard Operating Procedure provides a detailed, step-by-step guide to ensure the task is performed safely, efficiently, and correctly. It covers the entire process from preparation and energy isolation to disassembly, installation, and final testing, with a strong emphasis on Lockout/Tagout, lifting safety, and proper bolt torquing to minimize risk and ensure a rapid return to service.
Pre-Job Preparation: Resource Planning and Risk Assessment
Thorough preparation is the foundation for a safe and successful roll shell replacement. This phase involves assembling the right team, gathering necessary resources, and formally assessing potential hazards before any work begins.
Personnel Requirements and Roles
The work team must consist of qualified personnel, including certified maintenance mechanics, a trained rigger for lifting operations, and a designated supervisor responsible for overall coordination and safety compliance. All team members must be trained on this specific SOP and the hazards associated with the task.
Clear communication channels and roles must be established before starting. The supervisor must verify that each team member understands their responsibilities and is equipped with the necessary skills and knowledge to perform them safely.
Tool and Material Inventory Checklist
A complete checklist of all required tools and materials must be verified before commencing work. This list typically includes specialized pullers, calibrated hydraulic torque wrenches, high-strength lifting slings, the new roll shells, new high-tensile bolts, and appropriate personal protective equipment. Having all items on hand prevents dangerous improvisations and work interruptions.
All tools, especially lifting equipment and torque wrenches, must have current inspection certifications to ensure their integrity and accuracy under load.
Review of Technical Documentation
The equipment manufacturer's manual must be consulted to identify critical specifications. Key parameters include the correct bolt torque values, the sequence for tightening and loosening bolts, and any special procedures for removing and installing the shells. Deviating from the manufacturer's instructions can lead to component failure.
The manual may also specify recommended lubricants and sealants. Using the correct materials is essential for the longevity and proper function of the newly installed components.
Work Permit and Job Safety Analysis
A formal work permit must be issued, and a Job Safety Analysis must be conducted. The JSA involves the entire team in identifying potential hazards for each step of the procedure, such as pinch points, falling objects, and stored energy. For each hazard, specific control measures are defined, such as using barrier tape, establishing a lifting zone, and implementing strict energy isolation.
This proactive risk assessment ensures that all hazards are acknowledged and mitigated before work begins, creating a safer work environment.
Safety Isolation and Energy Control
This is the most critical safety step in the entire procedure, designed to prevent the accidental release of energy. Lockout/Tagout is a mandatory and non-negotiable life-saving practice.
Execution of the Complete Shutdown Procedure
The crusher must be brought to a complete stop using the normal operational controls. Communication with the control room is essential to confirm that the equipment is isolated from the production process and that all system interlocks are respected. The local emergency stop button should be activated to provide a secondary level of safety.
The shutdown procedure must be clearly documented and followed precisely to ensure the machine is in a safe state for maintenance.
Isolation of All Energy Sources
Every potential energy source must be isolated. This includes disconnecting and locking out the main electrical power supply to the crusher drive motor. Additionally, hydraulic and pneumatic systems must be isolated by closing and locking isolation valves. The goal is to create a zero-energy state.
Simply turning off a switch is insufficient. Physical isolation devices must be used to prevent any possibility of the equipment being energized.
Strict Adherence to Lockout/Tagout Protocol
Each member of the work team must apply their own personal lock and tag to the energy isolation device. This practice ensures that no one can re-energize the equipment until every individual has finished their work and removed their lock. The tag must clearly identify the person who applied the lock and the reason for the lockout.
This collective responsibility is a fundamental principle of LOTO, protecting every worker on the job.
Verification of Energy Release
After applying locks and tags, the isolation must be verified. Technicians must attempt to start the crusher from the local control station to confirm that power is disconnected. For hydraulic systems, the pressure must be bled off from all circuits using designated bleed valves. Visually confirming that the rolls have come to a complete stop is also necessary.
This verification step provides positive confirmation that the equipment is safe to work on.
Disassembly and Removal of the Old Roll Shells
With the crusher safely isolated, the process of removing the worn shells can begin. A methodical and careful approach prevents damage to the crusher's shaft and other components.
Removal of External Guards and Components
All external guards covering the rolls, drives, and adjustment mechanisms must be removed to provide access. Any connected components, such as feed chutes or discharge skirts that obstruct access to the roll shells, should also be carefully detached and stored safely.
This step requires care to avoid damaging the guards or the connecting hardware, as they will need to be reinstalled later.
Loosening and Removal of High-Strength Bolts
The roll shells are secured by numerous high-strength bolts. These bolts must be loosened in a crisscross or star pattern to avoid warping the shell. Using the correct socket and a power tool, the bolts are loosened in stages. Once loose, they are completely removed and stored in a container to prevent loss.
Following the manufacturer's specified sequence is critical to ensure the shell is released evenly from the shaft without binding.
Safe Separation of the Shell from the Shaft
Roll shells can be tightly fitted onto the shaft due to corrosion or interference fits. Forced hammering should be avoided. Instead, dedicated threaded puller holes are typically provided on the shell. Hydraulic pullers or jacks are used to apply even, controlled pressure to break the shell free from the shaft.
This method prevents damage to the shaft journal and ensures the shell can be removed safely and predictably.
Lifting and Transporting the Old Shell
Once free, the heavy shell must be lifted using an approved hoist and lifting slings. The lift plan must ensure the shell is balanced and will not swing uncontrollably. The old shell is then moved to a designated storage or disposal area. The exposed shaft must be thoroughly cleaned of any debris or rust to prepare for the new shell.
The lifting operation must be directed by a qualified rigger, and the area beneath the load must be clear of personnel.
Installation and Positioning of the New Roll Shells
The installation of the new shells is a precision task. Cleanliness, correct alignment, and proper bolt torquing are essential for ensuring long service life and reliable operation.
Cleaning and Inspection of Components
The new roll shell and the crusher shaft must be meticulously cleaned. All contact surfaces should be free of dirt, oil, and burrs. The new shell and the corresponding shaft area must be inspected for any signs of damage during transport or storage. Any imperfections should be addressed before proceeding.
Applying a thin, approved anti-seize compound to the shaft can facilitate future removal, unless the manufacturer specifies otherwise.
Lifting, Alignment, and Mounting
The new shell is carefully lifted and aligned with the shaft. It is then guided onto the shaft evenly, ensuring it does not cock or bind. Using guide bolts or other alignment aids can help in this process. The shell must be pushed or pressed fully into its final position on the shaft.
Forcing the shell into place can damage both the shell and the shaft. Patience and proper alignment are key.
Initial Installation and Tightening of Bolts
The new high-strength bolts, cleaned and lightly oiled on the threads, are installed by hand. Once all bolts are in place, they are tightened finger-tight. Then, using a torque wrench, the bolts are tightened in a specific crisscross pattern to a preliminary torque value, as specified by the manufacturer. This ensures the shell is seated evenly against the shaft.
This initial tightening step is crucial for achieving a uniform clamp load across the entire shell.
Final Torquing with a Calibrated Wrench
The final and most critical step is torquing the bolts to their full specified value. A calibrated hydraulic torque wrench must be used for accuracy. The bolts are tightened again in the prescribed sequence to the exact final torque. This process may involve multiple passes to ensure all bolts have reached the correct tension.
Under-torquing can lead to bolt loosening and shell movement, while over-torquing can stretch and weaken the bolts, leading to failure.
Post-Replacement Inspection, Testing, and Commissioning
After installation, a series of checks and tests are mandatory before returning the crusher to service. This ensures the repair was successful and the equipment is safe to operate.
Comprehensive Final Inspection
A thorough visual inspection is conducted to verify that all bolts are tight, all guards are correctly reinstalled, and all tools have been removed from the work area. The crusher's lubrication system should be checked to ensure proper oil levels.
This final check is a last line of defense against oversights that could lead to equipment damage or failure upon startup.
Reversing the Lockout/Tagout Procedure
Only after the final inspection is complete and the supervisor has given approval can the LOTO procedure be reversed. Each team member removes their personal lock and tag. The energy isolation devices are then restored to their operational state.
This step formally returns control of the equipment to the operations team.
No-Load Test Run
Before feeding any material, the crusher is started and operated without load. During this test, technicians listen for unusual noises and check for excessive vibration. They also verify that the rolls are rotating smoothly and that the gap adjustment mechanism is functioning correctly.
Any anomalies detected during the no-load test must be investigated and corrected before proceeding.
Gradual Load Testing and Adjustment
Finally, material is introduced gradually into the crusher. The operator monitors the crusher's power draw, sound, and product size. The roll gap may need minor adjustments to achieve the desired product specification. The crusher is observed under load for a sufficient period to ensure stable operation.
This gradual run-in period allows the new shells to settle and ensures the entire system is functioning as intended before full production resumes.
Following this comprehensive SOP for roll shell replacement is essential for maintaining the integrity of the crushing equipment and, most importantly, for safeguarding the personnel who perform this critical maintenance task.