Counter-plate bolt tightening inspection and anti-loosening maintenance for EU Impact Crusher
This comprehensive guide details the critical procedures for inspecting, tightening, and maintaining the counter-plate bolts on an EU Impact Crusher. The integrity of these bolts is paramount for safe and efficient operation, as failure can lead to severe mechanical damage and significant production downtime. This resource covers standardized torque specifications, systematic inspection routines, proven anti-loosening techniques, and essential safety protocols to ensure long-term equipment reliability and operational safety.
Impact and Risk Analysis of Counter-Plate Bolt Loosening
Loosening of counter-plate bolts in an EU Impact Crusher initiates a cascade of detrimental effects that compromise the entire crushing process. Even minor loosening can create perceptible increases in operational vibration and noise, which are early indicators of a developing problem. This vibration not only damages the crusher's structural components but also transmits stress throughout the mobile plant, potentially affecting screens and conveyors.
If left unaddressed, a loose bolt can progress to complete failure, resulting in the dislodgment of a counter-plate. This creates a direct metal-to-metal contact scenario between the high-speed rotor and the crusher housing, an event that typically causes catastrophic and expensive damage. The resulting unplanned shutdown for repairs leads to substantial production losses and high replacement part costs, making proactive maintenance a financially sound strategy.
Impact of Bolt Loosening on Equipment Performance
When counter-plate bolts begin to loosen, the plate itself shifts from its optimal position. This movement directly alters the predefined crushing gap, a critical parameter controlling the size and shape of the final product. The output material may become inconsistent, with an increase in oversized or poorly shaped particles. Furthermore, the crusher's energy efficiency drops, as impact energy is wasted in moving the loose plate rather than being fully transferred into breaking rock.
The altered dynamics within the crushing chamber also lead to uneven wear on the blow bars and the counter-plates themselves. This uneven wear shortens the service life of these expensive wear parts and further destabilizes the crushing process, creating a cycle of declining performance and increasing operational costs.
Safety Hazards and Equipment Damage Risks
The primary safety hazard associated with a failed counter-plate bolt is the potential for the plate to be violently ejected from the crusher. While the housing is designed to contain such events, the resulting shock loads can compromise the integrity of the entire frame. Internally, a dislodged plate allows the rotor to strike the crusher's backframe, an impact for which the system is not designed.
Such an event can crack the main frame, bend the rotor shaft, and destroy the bearing assemblies. The immediate and total failure of the crusher is almost guaranteed. The subsequent repair is not only costly in terms of parts but also requires extensive, skilled labor and results in prolonged, unplanned production stoppages that can jeopardize project timelines.
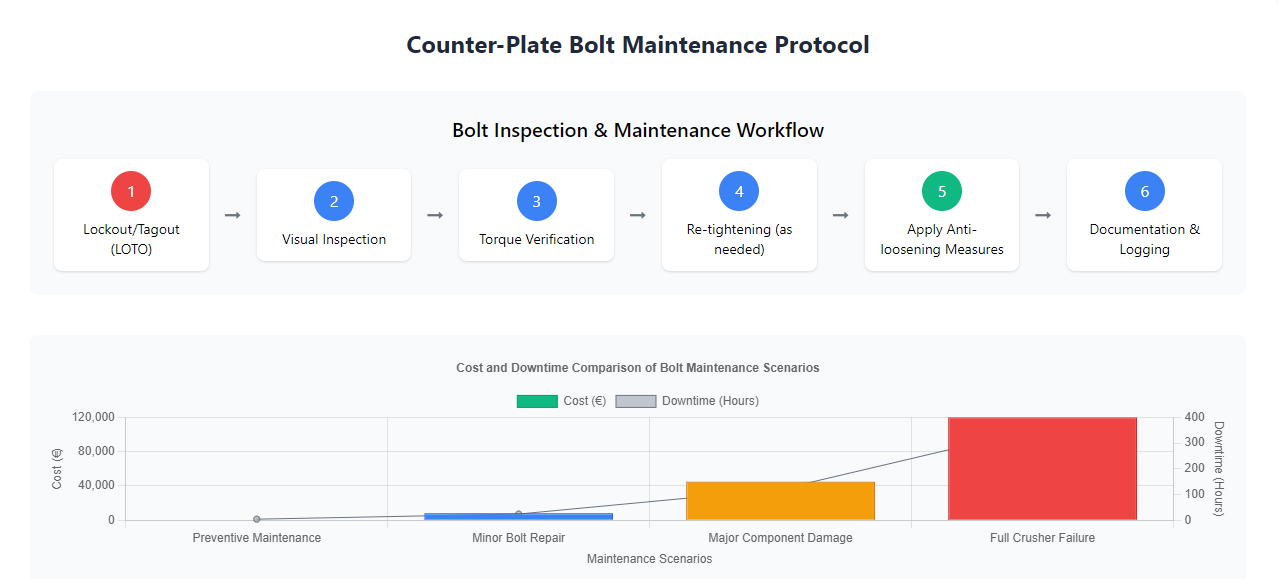
Assessment of Repair Costs and Production Losses
The financial impact of a bolt failure event extends far beyond the cost of a new bolt. A comprehensive repair may involve replacing the counter-plates, multiple blow bars on the rotor, and potentially the rotor itself if it has been damaged. The crusher's main bearings and housing may also require inspection and repair.
Concurrently, the production line is completely halted. For a high-capacity plant serving a major project, this can mean thousands of tons of lost production per day. The combined cost of replacement parts, specialized labor, and lost production can easily reach a figure that is hundreds of times greater than the cost of implementing a rigorous, preventive bolt maintenance program.
Economic Value of Preventive Maintenance
Investing in a systematic bolt inspection and tightening regimen is one of the most cost-effective practices in crusher maintenance. The resources required—a calibrated torque wrench, a trained technician, and a small amount of scheduled downtime—are minimal compared to the potential losses from a catastrophic failure. This proactive approach transforms a high-risk, high-cost potential failure into a predictable, manageable, and low-cost maintenance task.
By adhering to a scheduled maintenance plan, operators can extend the service life of major components, maintain consistent product quality, and ensure high plant availability. The return on investment for preventive maintenance is overwhelmingly positive, safeguarding both the mechanical asset and the profitability of the operation.
Bolt Tightening Standards and Torque Specifications
Achieving and maintaining the correct clamping force in counter-plate bolts is a precise engineering task, governed by established standards and specifications. The manufacturer's recommended torque values are calculated to stretch the bolt to a specific point within its elastic range, creating a clamping force that is sufficient to resist operational vibrations and dynamic loads without causing damage to the bolt threads or the crusher's housing.
Using the correct torque is non-negotiable. Under-torquing fails to generate adequate preload, leaving the connection vulnerable to loosening. Over-torquing can stretch the bolt beyond its yield point, permanently damaging it and leading to stress fracturing or thread stripping in the tapped hole, which is a far more serious repair.
Correlation Between Torque Values and Bolt Specifications
Torque specifications are directly tied to the bolt's grade, diameter, and thread pitch. For example, a high-tensile Grade 8.8 M36 bolt will have a significantly higher torque requirement than a Grade 5.8 M30 bolt. These values are typically provided by the crusher manufacturer in the equipment's service manual and must be strictly followed.
It is critical to use the specified grade of bolt for replacement. Substituting a lower-grade bolt and applying the specified torque will likely result in its failure, while a higher-grade bolt might not achieve the correct preload with the same torque value. The table of torque values is a fundamental reference document for all maintenance personnel.
Fastening Sequence and Step-by-Step Tightening Requirements
Counter-plates are secured by multiple bolts, and a specific tightening sequence must be followed to ensure the plate is drawn down evenly and without distortion. The general rule is to follow a star or crisscross pattern, moving from the center bolts outward. This prevents the plate from being cocked or pinned in a misaligned position.
The tightening process should be performed in multiple steps. For instance, the first pass might bring all bolts to 30% of the final torque, a second pass to 60%, and a final pass to 100%. This incremental approach allows the plate to settle and the stress to distribute uniformly across the entire bolted joint and the plate itself, ensuring a stable and long-lasting connection.
Torque Check and Verification Procedures
After the initial tightening, a verification check should be performed after a short period of operation, typically 8 to 24 hours. During this check, the torque on each bolt is measured again without first loosening it. If a bolt is found to have lost a significant percentage of its torque, it indicates that the joint has settled or that the anti-loosening method is inadequate.
This re-torquing cycle is crucial for new installations or after major wear part changes. A stable bolt, once re-torqued, should maintain its setting for a much longer period. Keeping a log of these verification checks helps establish a reliable maintenance interval for the specific operating conditions of the crusher.
Bolt Preload and Elongation Measurement
For critical applications, the most accurate method to ensure proper clamping force is to measure bolt elongation rather than relying solely on torque. Torque is an indirect measure of preload, as a significant portion of the applied torque is wasted in overcoming friction under the bolt head and in the threads. Elongation, however, is a direct measure of the bolt's stretch and thus its preload.
This method requires bolts that are designed for such measurement, often with protruding ends or central holes. Using ultrasonic measuring devices, technicians can precisely determine the length of the bolt before and after tightening. This technique provides the highest degree of accuracy and is sometimes used for the largest and most critical bolts in a crusher assembly.
Periodic Inspection Process and Standard Methods
Implementing a disciplined and periodic inspection routine is the frontline defense against bolt-related failures. This process should be multi-tiered, involving daily visual checks by operators and more detailed, metered inspections by maintenance technicians at scheduled intervals. The frequency of these inspections should be determined by the crusher's operating hours and the severity of its duty cycle.
A well-documented inspection process ensures that nothing is overlooked and provides a clear audit trail of the equipment's maintenance history. This data is invaluable for identifying trends, such as a specific bolt that repeatedly loosens, which can point to a more fundamental issue like a damaged thread or a warped counter-plate.
Daily Inspection Items and Key Focus Areas
Operators should perform a visual inspection of the crusher's exterior at the beginning of each shift. While they cannot see the bolts directly, they can listen for changes in crushing sound and monitor vibration levels. Any new or increasing hammering noise from the crushing chamber can be a key audible indicator of a loose counter-plate.
They should also check around the crusher for any dust that may be leaking from new locations on the housing, which could indicate a shifting seal or a gap caused by internal component movement. Reporting these subtle changes immediately allows maintenance teams to investigate potential issues before they escalate into major failures.
Regular Professional Inspection Procedures
A professional inspection, conducted weekly or bi-weekly depending on operation intensity, involves a thorough examination. After ensuring the crusher is safely isolated and locked out, a technician will open the inspection hatches to visually inspect the counter-plate bolts for any obvious signs of movement, such as witness marks on the paint or displaced locking devices.
The core of this inspection is a physical check using a calibrated torque wrench. The technician will attempt to apply the specified torque value to each bolt in the correct sequence. If a bolt moves before the torque wrench clicks, it has loosened and must be re-tightened according to the standard procedure. This check confirms the integrity of every bolted connection.
Inspection Tools and Equipment Requirements
The essential tool for this task is a high-quality, recently calibrated torque wrench with a range appropriate for the specified bolt torque. Using an uncalibrated or inappropriate tool gives a false sense of security and is worse than doing no check at all. Other tools include a brass brush for cleaning bolt threads and a thread gauge to check for wear.
For more advanced predictive maintenance, a vibration analyzer can be used to monitor the crusher's overall vibration signature. A trend showing a gradual increase in vibration at the crusher's operational frequency can be an early warning sign of developing looseness in the impact plate assembly or other internal components.
Inspection Records and Trend Analysis
Every inspection, from the daily operator check to the detailed technician torque verification, must be documented. The record should include the date, the person performing the check, the crusher's operating hours, and any observations or measurements taken. Specific torque values for each bolt, if measured, should be recorded.
Over time, this data allows for powerful trend analysis. If certain bolts are consistently found to be below torque, it indicates a need for a different anti-loosening strategy or a more frequent inspection interval. This data-driven approach moves maintenance from a reactive to a predictive and proactive model, maximizing crusher reliability.
Anti-Loosening Technology and Locking Device Applications
Given the extreme vibrational environment inside an impact crusher, standard bolts will inevitably loosen over time. Therefore, the application of positive locking devices is not optional but a mandatory part of the assembly. These devices work on various principles to resist the rotational forces that cause bolts to back out, thereby maintaining the critical preload for extended periods.
Selecting the right anti-loosening method depends on the specific application, the bolt size, and the required level of security. In many EU Impact Crushers, a combination of methods is used to provide redundant security against loosening, ensuring that even if one method is compromised, another will maintain the bolt's position.
Mechanical Locking and Anti-Loosening Washers
Mechanical locking devices physically prevent the nut or bolt head from rotating. A common and effective method is the use of a lock washer in conjunction with a lock nut. The lock washer, often a spring or tooth-type, applies a constant spring force against the nut, while the deformed threads of a nylon-insert lock nut create significant friction.
For heavier loads, castellated nuts with cotter pins are used, providing a purely mechanical lock that is highly reliable. Another robust option is the use of tab washers, where tabs are bent up against the flats of the nut after tightening, physically blocking its rotation. These methods are visually verifiable, making inspection quick and straightforward.
Chemical Locking and Thread Locking Compounds
Thread locking adhesives, commonly known as threadlockers, are anaerobic resins that are applied to bolt threads before assembly. When confined between the threads in the absence of air, the compound hardens into a tough plastic, effectively locking the threads in place. These are available in various strengths, from removable grades for smaller bolts to high-strength, permanent formulas for large, critical fasteners.
The application is simple but requires clean, oil-free threads to ensure a proper bond. This method is highly effective at filling micro-gaps between threads, which helps to distribute load more evenly and can also provide a sealing function, preventing the ingress of moisture and dust that could lead to corrosion and seizure.
Plastic Locking and Deformation Anti-Loosening
This category includes techniques that use the plastic deformation of metal to create a locking action. One method is the torque-to-yield technique, where the bolt is intentionally tightened into its plastic deformation zone. This creates a very high and precise preload, but these bolts are typically one-time-use and must be replaced after being loosened.
Another common deformation method involves bolts with patches of nylon or other polymer on the threads, which create an interference fit when threaded in. Alternatively, all-metal lock nuts have a slightly out-of-round section at the top or a crimped section that creates friction when mated with the bolt threads. These are reusable but have a finite number of safe reapplication cycles.
Hydraulic Tightening and Tension Control
For the largest bolts found on heavy-duty crushers, hydraulic torque wrenches or tensioning systems are the preferred tools. Hydraulic torque wrenches provide extremely accurate and repeatable torque application, eliminating the human error associated with manual torque wrenches. They are especially useful in confined spaces where leverage is limited.
Hydraulic tensioners are even more advanced. They stretch the bolt directly to a predetermined elongation, and then the nut is run down finger-tight against the joint. When the hydraulic pressure is released, the bolt's elastic recovery creates the precise preload. This method is considered the gold standard for ensuring even, accurate clamping force across multiple large-diameter bolts.
Maintenance Operation Specifications and Safety Requirements
All maintenance activities on an EU Impact Crusher, especially those involving the internal crushing chamber, must be conducted under strict safety protocols. The immense kinetic energy stored in the rotor and the potential for unexpected machine start-up present life-threatening hazards. A formal, documented safety procedure is the non-negotiable foundation of any maintenance task.
This process begins with a risk assessment and continues through to the final verification that the crusher is safe to return to service. No maintenance task is so urgent that it justifies bypassing established safety standards. Adherence to these protocols protects personnel, preserves the equipment, and ensures the long-term viability of the operation.
Pre-Work Safety Preparation and Isolation
The first and most critical step is the complete and verifiable isolation of the crusher from all power sources. This involves shutting off and locking out the main electrical disconnect for the crusher motor and the associated hydraulic power unit. A physical lock should be placed on the disconnect switch by the authorized person performing the work, and they must retain the only key.
In a mobile crusher setup, this also includes isolating the onboard power generation system. Furthermore, potential energy sources must be dissipated. The rotor should be mechanically blocked to prevent any movement, and hydraulic systems should be depressurized. This comprehensive isolation, known as a Lockout/Tagout (LOTO) procedure, is the only safe way to begin maintenance.
Maintenance Personnel Qualifications and Skill Requirements
Only trained and authorized personnel should perform counter-plate bolt maintenance. This training must cover both the technical aspects of the task—understanding torque values, sequences, and tools—and the critical safety procedures, including LOTO. Personnel should be familiar with the specific model of EU Impact Crusher and have access to its complete service manual.
Beyond technical skill, personnel must be trained to recognize potential hazards, such as identifying cracked components or worn threads during inspection. They should also be proficient in the use of all required tools, from torque wrenches to hydraulic tensioning systems, to ensure the work is performed correctly and safely.
On-site Job Environment and Condition Preparation
The work area around the crusher must be prepared before maintenance begins. This includes ensuring adequate lighting inside the crushing chamber and on the work platform. The area should be clean and free of oil, grease, and loose material to prevent slips and falls. All necessary tools, replacement parts, and personal protective equipment (PPE) must be gathered and inspected beforehand.
PPE for this task is mandatory and typically includes a hard hat, safety glasses, steel-toed boots, heavy-duty gloves, and hearing protection. If work is being performed at height, fall protection equipment is required. Having a clean, organized, and well-prepared work environment significantly reduces the risk of accidents and improves the efficiency of the maintenance operation.
Emergency Response and Contingency Plans
Despite all precautions, emergencies can occur. All personnel involved in the maintenance must be briefed on the emergency procedures for the site. This includes the location of first-aid kits, emergency eyewash stations, fire extinguishers, and the procedures for reporting an incident.
A communication plan should be established, especially when working inside a crusher where visibility and audibility are limited. A dedicated spotter should be stationed outside to monitor the personnel working inside and to act as a communicator in case of an emergency. Knowing the exact site address and having a clear plan for contacting emergency services is a fundamental part of the pre-work briefing.
Common Problem Diagnosis and Treatment Solutions
Even with a perfect maintenance regimen, issues with bolts and threads can arise. The ability to correctly diagnose and remedy these problems is essential for minimizing downtime. A systematic approach that identifies the root cause, rather than just addressing the symptom, prevents the problem from recurring and ensures the long-term integrity of the crusher's bolted connections.
Common problems range from simple thread damage to more complex issues like repeated loosening. Having the correct tools, replacement parts, and technical knowledge on hand allows maintenance teams to resolve these issues efficiently and safely, returning the crusher to optimal operation with minimal delay.
Thread Damage Repair and Treatment
Stripped or damaged threads in the crusher's housing are a serious issue. For minor damage, a thread chaser or tap can be used to clean and reform the threads. It is critical to use a tap designed for cleaning existing threads, not for cutting new ones, to avoid removing any more material than necessary.
For more significant damage, a thread insert, such as a Helicoil or a solid bushing insert, may be required. This involves drilling out the damaged hole, re-tapping it to a larger size, and installing a permanent insert that has the original internal thread size. This repair restores the strength of the connection and is a standard practice for salvaging expensive components. Proper alignment during this process is critical to avoid cross-threading the new insert.
Seized Bolt Removal Techniques
Bolts can seize in their threads due to corrosion, galling, or the ingress of fine abrasive material. Forcibly turning a seized bolt can lead to shearing, leaving the threaded portion embedded in the hole, which is a much more difficult problem to solve. The first step is to apply a penetrating oil and allow it time to work. Applying gentle heat to the surrounding housing can help break the corrosion bond, but care must be taken not to overheat and affect the material properties.
If the bolt still will not turn, an impact wrench can sometimes shock it loose. As a last resort, the bolt head may need to be carefully cut off with an oxy-acetylene torch or an angle grinder, allowing the counter-plate to be removed and providing better access to the remaining stud for extraction with a stud extractor. This process requires a high degree of skill to avoid damaging the impact rack or housing.
Analysis and Resolution of Repeated Loosening
If a specific bolt or set of bolts repeatedly loosens despite correct tightening and the use of locking devices, it indicates an underlying issue. The root cause could be a warped or uneven counter-plate, causing a non-uniform load on the bolts. It could also be an underlying fracture in the crusher's housing that is flexing under load.
A thorough investigation is required. This may involve checking the flatness of the counter-plate and the mounting surface with a straightedge. Using a different, more robust anti-loosening method, such as switching from a lock washer to a chemical threadlocker combined with a tab washer, can also provide a solution. Identifying and rectifying the root cause is essential to break the cycle of repeated loosening.
Seal Failure and Leakage Management
The bolted joint between the counter-plate and the crusher housing often incorporates a seal to prevent the leakage of dust. If dust is observed leaking from around a bolt or from the edge of the plate, the seal has likely failed. This can be caused by an uneven clamping force, a damaged sealing surface, or a degraded gasket material.
Resolution involves disassembling the joint, thoroughly cleaning both sealing surfaces, and replacing the seal or gasket. It is important to inspect the surfaces for nicks or grooves that could provide a path for leakage. When reassembling, ensuring a clean, dry surface and following the correct torque sequence is vital to compressing the new seal evenly and creating an effective dust barrier.